Many phonon resonance experiments for material transmutation require a dwell time at specific temperatures.
Common household ovens or similar devices are unsuitable because their temperature fluctuates too much. Industrial temperature chambers are unaffordable for independent researchers, often costing upwards of five figures.
One way to build a temperature chamber as a DIY project is by combining a common household device with a custom-built PID controller. The build requires basic electrical and safety skills as well as technical understanding to manage the settings of the PID controller and its learning process. PID controllers are powerful mini-computers for regulating temperature effectively and are available online for only $100–$200. For the chamber, you could use a rice cooker or another device designed for heating and containing a medium.

1. Choose a heating device
Select a heating device (e.g., a rice cooker for a water medium or a mini kiln for solid mediums). The device should not have electronic controls, only an on/off functionality. This is necessary because the PID controller will turn the device on and off by controlling its power supply. Be sure to use a device that will not overheat, even if the PID controller sends constant power. For example, rice cookers often include a safety switch that disengages power when the water level is too low. The chamber or vessel needs to have thermal mass for consistent heat distribution.
If the heat source has too much power compared to the target temperature, consider using a speed controller
2. Build a custom PID temperature controller
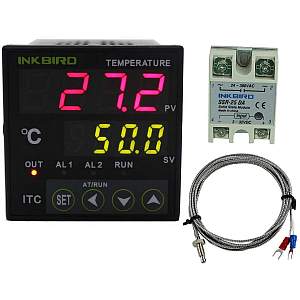
PID controllers are delivered as components, so you need to provide the housing and wiring yourself. Purchase a PID controller that offers high precision and includes an electronic relay as shown in the image. The switching pattern should be on/off rather than PWM. Place the PID controller in a case and add switches, fuses, and cables for line input and heating output. Use high-precision temperature probes to connect to the PID controller. For lower temperatures, PT100 probes are highly accurate.
If you require multiple temperature levels during the dwell time, opt for a PID controller with a "ramp/soak" feature. This allows you to program a temperature curve, such as maintaining 100°C for 1 hour, increasing to 200°C over another hour, and holding 200°C for 2 hours.
3. Calibrate the PID controller and probes
A PID controller and its probes might have an offset error, so a precision temperature gauge is needed for calibration. High-precision temperature gauges are expensive, but you might find a used one with a margin of error as low as 1°C. To calibrate your PID controller, use both probes at the same time and compare readings from the PID and the precision temperature gauge at your target temperature. Adjust the offset in the PID controller settings to match the more accurate temperature gauge reading. Your PID controller is now calibrated at target temperature.
4. Learn the PID controller
A PID controller is a mini-computer that learns parameters to keep the temperature nearly constant. Use the auto-learn feature or apply manual learning routines to optimize the controller for the best parameters and precise temperature control.
5. Use a temperature logger
A temperature logger is a helpful tool for monitoring the real temperature over time during extended dwell periods. It saves data points and displays them graphically. The graphical view also helps optimize the PID settings for even better performance.
6. Calculate the system's total error
Even with high-precision instruments, there will always be some error. Calculate the total error to understand your system’s accuracy. For example, if the high-precision display has a 1% error and the probe has a 1% error (both at the target temperature), the resulting error is about 1.4%. Use the root-sum-square (RSS) formula:
Total Error = sqrt((Error_1)2 + (Error_2)2 + ... + (Error_n)2)
Thus, a displayed temperature of 50°C could range between 49.3°C and 50.7°C. Knowing this, you can refine your experiment protocol by repeating the process at different levels within the range to hit the resonance temperature.
7. Minimize probe error
As a general rule, higher target temperatures increase system error. Using multiple probes can reduce the error rate by averaging their measurement values. Also, temperature probes for higher temperatures might experience drift based on the technology. Always check the manuals and calculate the error rate to achieve the highest accuracy.
Have fun building your PID controller!
Please share your DIY build or ask questions below.
Consulting
If you need dedicated support, we also offer personal consulting and custom PID controllers.
Before experimenting read our disclaimer